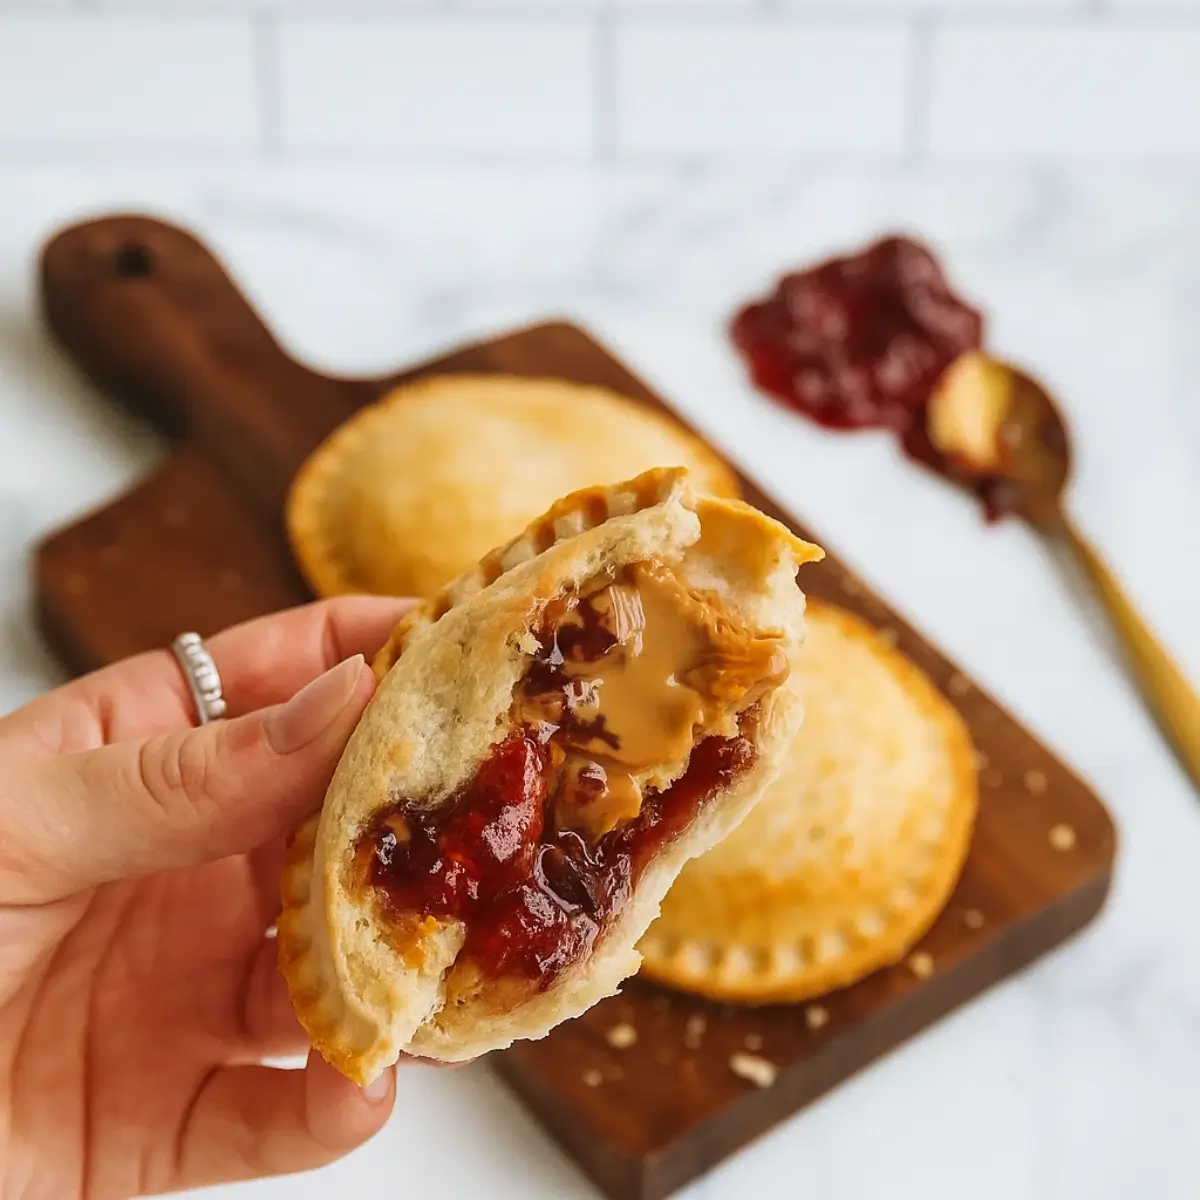
If there’s one phrase that sparks pure lunchtime joy in my household, it’s Homemade Uncrustables. I mean, is there anything more comforting than biting into a soft, sealed sandwich filled with ooey-gooey goodness? And if you’ve got picky eaters or a schedule that looks more like a Tetris puzzle, these little pockets are a lifesaver.
When my youngest started kindergarten, I was desperate for a lunch option that didn’t get sent home untouched. Enter: these delightful little DIY Uncrustables. Let’s just say they’re now a regular in our lunchbox lineup—and not just for the kids. (Yes, I’ve been known to snack on one mid-morning with my coffee.)
Table of Contents
Why You’ll Love These Homemade Uncrustables
Whether you go classic with peanut butter and jelly or dress them up with Nutella and banana slices (our current obsession), homemade Uncrustables check every box:
- Quick to make—just a few ingredients and no fancy tools required.
- Totally customizable—sweet, savory, or somewhere in between.
- Budget-friendly—way cheaper than the store-bought version.
- Freezer-friendly—make a big batch and thank yourself later.
Plus, making them at home means you get to control the ingredients. No mystery oils or preservatives hiding in there.
What Do Homemade Uncrustables Taste Like?
Imagine the softest sandwich bread hugging your favorite fillings in a sealed little pocket of happiness. When air-fried, they get a golden, slightly crisp outer layer with warm, melty insides. Not air frying? That’s okay—room temp or lightly toasted, they’re still dreamy.
Think of it as the sandwich version of a hug from grandma.
Ingredients You’ll Need for Homemade Uncrustables (with Banana Nutella & S’mores Options)
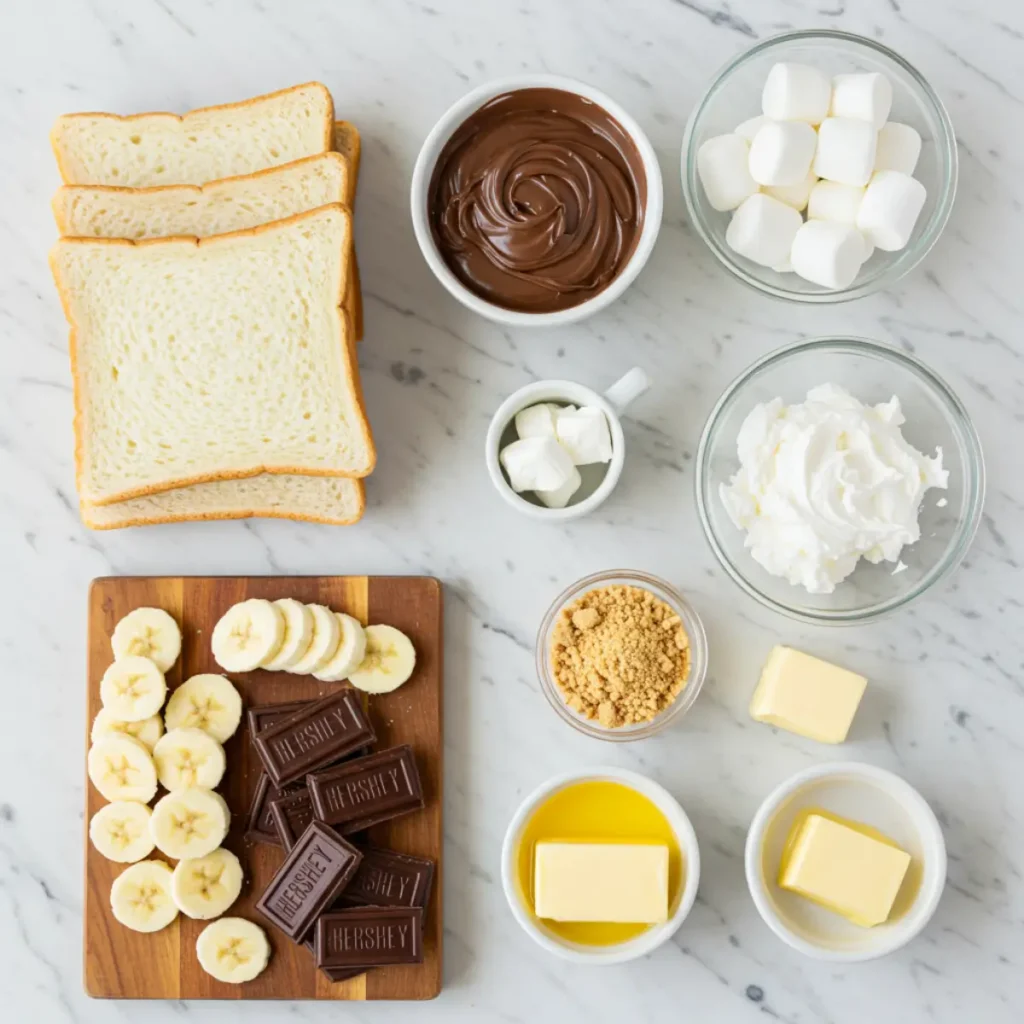
One of the best things about Homemade Uncrustables is that you don’t need anything fancy—just a few pantry staples and a bit of creativity. If you’ve got a loaf of bread and something delicious to spread, you’re already halfway there.
Below is everything you’ll need to whip up both our Banana Nutella and S’mores versions. Feel free to mix and match based on what your family loves or what’s already in your kitchen!
Banana Nutella Homemade Uncrustables
This combo is pure magic. Creamy, chocolatey Nutella meets naturally sweet banana slices—and when sealed in soft bread? It becomes a dreamy snack or lunchbox favorite. Here’s what you’ll need:
- White Sandwich Bread – Soft, fresh bread works best. Look for a brand without large air pockets so the filling stays neatly inside. You can also use whole wheat if that’s more your jam!
- Nutella – That smooth, hazelnut-chocolate spread we all know and love. If you have a nut allergy, try a sunflower spread instead.
- Ripe Bananas – Not too mushy, not too firm. Sliced thin so they lay flat inside your sandwich pockets.
- Unsalted Butter (optional) – Only needed if you’re air frying your uncrustables. A light brush gives them that golden, crispy exterior without being greasy.
✨ If your kids love banana-based snacks, definitely check out my Peanut Butter Banana Roll-Ups for another lunchbox winner.
S’mores Homemade Uncrustables
Now this one? It’s dessert in disguise. These s’mores-inspired uncrustables are everything you love about the campfire classic, just cleaner and more convenient (no sticky fingers or smoky clothes required!).
- White Bread – Again, stick with soft sandwich bread that’s easy to press and seal. Crustless works beautifully if you’re trying to mimic the store-bought look.
- Marshmallow Fluff – Sweet, sticky, and irresistible. Spread a thin layer so it doesn’t gush out while air frying.
- Hershey’s Milk Chocolate Squares – Break them into small sections that fit inside your bread circles. Or use chocolate chips in a pinch!
- Unsalted Butter – Helps the graham cracker coating stick and turns golden and crunchy in the air fryer.
- Graham Cracker Crumbs – Roll or press your buttered uncrustables in the crumbs before cooking for that iconic s’mores crunch and flavor.
Want to pair this with something fun and sweet? Try our Strawberry Snack Mix for a playful side treat!
Optional Tools That Make Homemade Uncrustables Easier:
While not essential, these kitchen helpers make things go smoother:
- Round Cookie Cutter or Glass – To cut uniform circles in your bread.
- Fork or Sandwich Sealer – Press the edges tight to prevent any filling from escaping.
- Air Fryer – If you want that crispy golden finish without turning on your oven.
Pro Tip: These ingredients are great for batch-making Homemade Uncrustables and freezing them for quick snacks or school lunches. That’s what I do on Sundays—make a double batch, flash freeze, and store. The next morning? Pop one straight into the lunchbox and it’s thawed by lunch.
How to Make Homemade Uncrustables Step-by-Step (Banana Nutella & S’mores Versions)
Making Homemade Uncrustables is one of those kitchen tasks that feels almost meditative—like folding laundry, but tastier. Whether you’re prepping them for school lunches, road trips, or after-school snacks, once you get the hang of it, you’ll be cranking them out like a sandwich-making pro.
Let’s walk through how to make two delicious versions—Banana Nutella and S’mores—step by step.
Banana Nutella Homemade Uncrustables (Kid-Favorite!)
Step 1: Cut the Bread Circles
Start with soft, fresh white bread. Use a round cookie cutter, biscuit cutter, or even the rim of a glass to punch out two circles per sandwich. Don’t toss the crust scraps—you can turn them into breadcrumbs or even cinnamon apple cottage cheese bites later!
Tip: If you’re using whole wheat or multigrain bread, just make sure it’s soft enough to press and seal easily.
Step 2: Add the Nutella
Spread about 1–1.5 teaspoons of Nutella onto the center of one bread circle. Keep it toward the middle—too close to the edges and it’ll squish out when sealing.
Step 3: Add Banana Slices
Place 2–3 thin banana slices on top of the Nutella. You want them flat and not too thick so the sandwich doesn’t get bulky and hard to close.
Step 4: Seal the Sandwich
Place a second bread circle on top. Press down gently around the edges with your fingers first. Then, use a fork to crimp the edges all the way around—or use a sandwich sealer if you have one. Make sure it’s sealed well so your filling stays put!
Step 5: Optional – Air Fry for Crispiness
If you love that warm, toasty exterior, brush both sides of the sealed Uncrustable with a bit of melted unsalted butter. Place it in the air fryer at 370°F for 4–5 minutes, flipping halfway through. You’ll end up with a golden, slightly crispy sandwich pocket that’s absolutely heavenly.
Want another banana-packed idea? These Loaded Apple Slices with peanut butter are a fun treat too!
S’mores Homemade Uncrustables (Dessert Disguised as a Sandwich)
Step 1: Cut Out Bread Circles
Same as above! You’ll need two bread circles per Uncrustable.
Step 2: Add Marshmallow Fluff
Spread a thin layer of marshmallow fluff in the center of one circle. A little goes a long way—it spreads when it heats, so resist the urge to glob it on.
Step 3: Add the Chocolate
Top the fluff with one piece of Hershey’s chocolate (or about a teaspoon of chocolate chips). Keep it centered so it melts into the middle when you air fry.
Step 4: Seal the Edges
Top with another bread circle, and press the edges firmly to seal. Use a fork or sandwich press to make sure it’s shut tight.
Step 5: Butter and Crumb Coating
Brush both sides with melted butter, then gently press each side into graham cracker crumbs. This gives your uncrustable that classic s’mores texture and flavor—like a campfire treat without the campfire.
Step 6: Air Fry to Golden Perfection
Place your S’mores Homemade Uncrustables in the air fryer at 370°F for 4–5 minutes, flipping once. The chocolate gets perfectly melty, the fluff puffs just a bit, and the graham coating turns golden and lightly crisp. Pure magic.
Veronica’s Tips for Homemade Uncrustables That Actually Seal
- Don’t overfill! I know it’s tempting to go wild with the Nutella or fluff, but too much = leaky disaster.
- Seal it like you mean it. Use the back of a spoon, a fork, or your fingers—just be firm and go all the way around.
- Let them rest for a minute. After air frying, give them a quick minute to cool slightly. The filling will be hot-hot and delicious.
Bonus Idea: Want a savory spin? Try making pizza-style uncrustables with a little marinara, shredded mozzarella, and mini pepperoni. Kind of like a pocket-sized calzone! Pair it with French Toast Muffin Cups for the ultimate brunch spread.
Tips and Tricks for Perfect Homemade Uncrustables
A few little lessons I’ve learned the hard way—so you don’t have to:
- Seal those edges! Press them like you mean it to avoid ooze mid-fry.
- Go easy on the fillings. Too much, and it’s a mess waiting to happen.
- Use fresh, soft bread. Day-old bread is harder to seal.
- Freeze them! These freeze beautifully. Just pop ‘em into a freezer bag, and toast or air fry straight from frozen.
And hey—if your edges don’t look perfect, that’s okay. They’ll taste amazing, and nobody’s judging your sandwich seam skills.
Recipe Variations: Let’s Get Creative
Here’s where the fun starts. Once you get the basic technique down, the possibilities are endless:
- PB&Banana – Like Elvis, but school-approved.
- Strawberry & Nutella – Hello, fancy brunch vibes.
- Pizza Pockets – Marinara, cheese, and pepperoni for the win.
- Ham & Cheese – Press and toast for a melt-in-your-mouth lunch.
Honestly, it’s kind of addictive. You’ll be staring into your pantry thinking, “What else can I stuff into bread?”
Storage
These are freezer MVPs.
- To freeze: Lay on a tray in a single layer until firm, then transfer to freezer-safe bags.
- To reheat: Air fry for 5–6 minutes or toast until warm.
- Shelf-life: Up to 2 months in the freezer; 1 day in the fridge (though they get soggy, so freeze if you can!).
FAQs
Do I need an Uncrustable press?
Nope! A fork, your fingers, or even a glass rim will do the trick.
Can I use whole wheat bread?
Absolutely. Just make sure it’s soft enough to seal.
Can I skip the air fryer?
Yes! They’re delicious un-fried too—just skip the butter step.
How long do they last in lunchboxes?
Pack them frozen, and they’ll be perfectly thawed by lunchtime.
Conclusion
Homemade Uncrustables are the kind of kitchen magic that makes life feel just a little easier—and a whole lot yummier. Whether you’re whipping them up on a busy school morning or batch-prepping on a lazy Sunday, they’re a sure-fire hit.
So go ahead and give these homemade Uncrustables a try. And if your crew gobbles them up like mine does, tag me on Instagram—I’d love to see what combos you come up with!
Follow us on Pinterest for weekly slow cooker inspiration, or join the conversation over on our Facebook page where fellow food lovers share their favorite comfort meals.