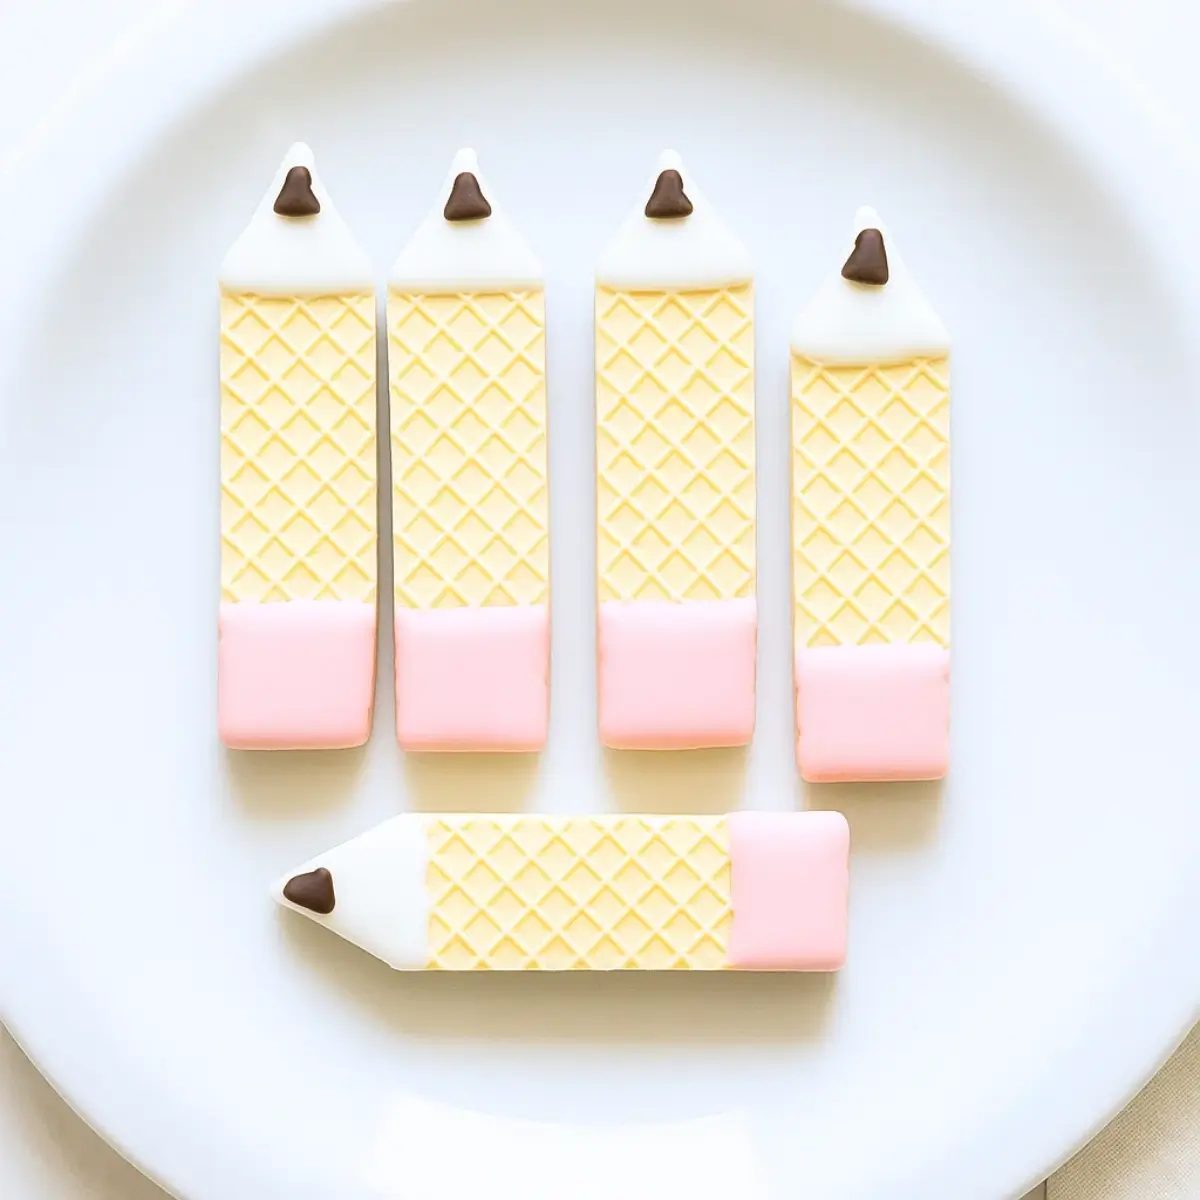
Back-to-school season can feel like running a marathon in flip-flops—papers to sign, lunches to pack, and don’t even get me started on those “spirit week” outfits. That’s why I love recipes like these Cute Back to School Wafer Pencil Cookies. They’re fun, quick, and guaranteed to bring a smile when your kids open their lunchbox.
These little pencil cookies are as simple as they are adorable—no baking, just a little chocolate melting, piping, and shaking (the cookies, not your hips… though that’s optional).
Table of Contents
Why You’ll Love These Cute Back to School Wafer Pencil Cookies
- No oven required—perfect for last-minute moms like me.
- They double as a fun activity with the kids.
- Adorable enough to impress the PTA without the stress.
- A sweet treat that makes school lunches exciting again.
What Do These Wafer Pencil Cookies Taste Like?
Think crunchy vanilla wafers dressed up in creamy white and pink chocolate with a tiny chocolate chip kick at the end. Sweet, crunchy, chocolatey, and just a touch of whimsy.
Ingredients You’ll Need for Cute Back to School Wafer Pencil Cookies
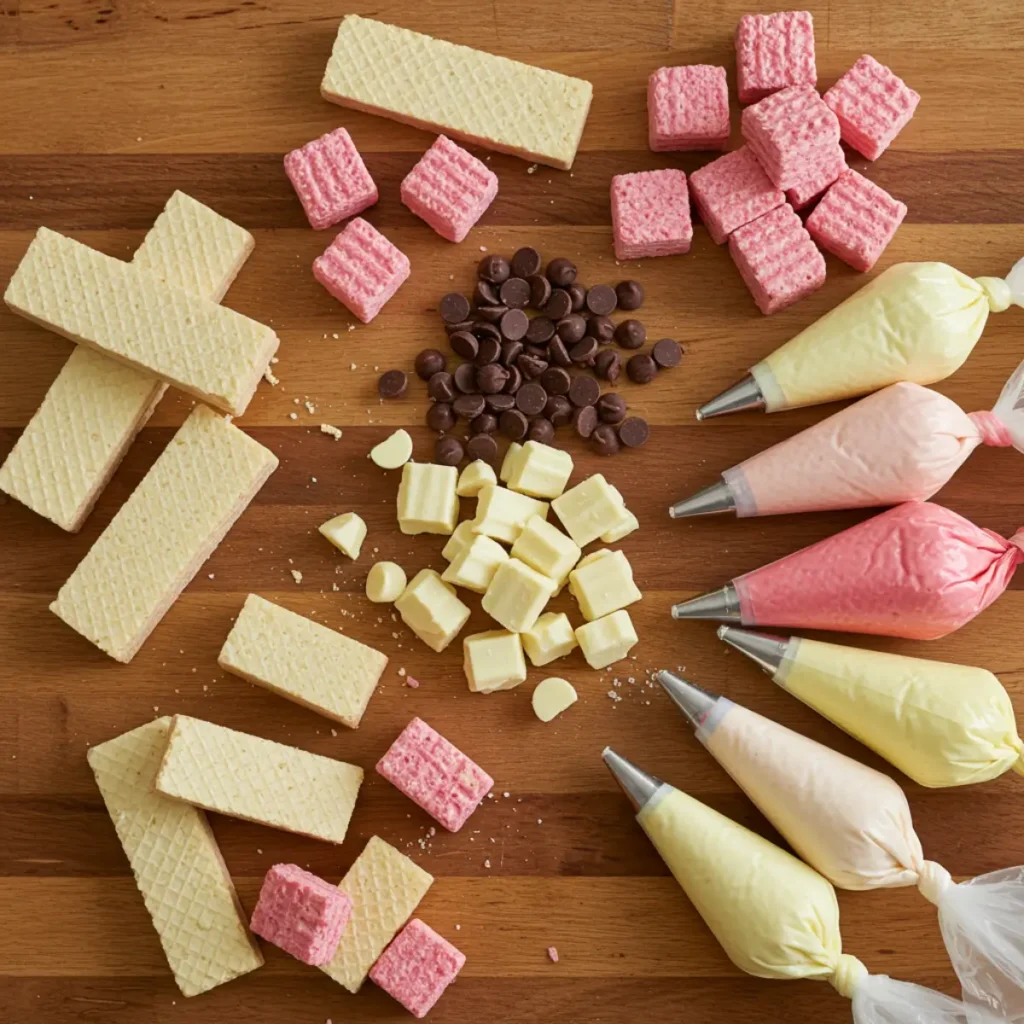
One of the best parts about making these Cute Back to School Wafer Pencil Cookies is that you don’t need a pantry full of fancy supplies. Everything comes together with just a handful of simple ingredients (and trust me, if you can melt chocolate in the microwave, you’re already halfway there). Let’s walk through what you’ll need and why each one matters:
- Vanilla Wafers – These are the base of your “pencils.” Their crisp texture makes the perfect crunch, and their long oval shape means less cutting and shaping for you. If you can’t find the classic brand, any store-bought vanilla wafer-style cookie will do.
- Bright White Chocolate Melting Wafers – This is what gives your pencils their “wooden” tip. I love using melting wafers because they stay smooth and glossy after cooling. Regular white chocolate chips can work in a pinch, but they may need a touch of shortening to thin them out.
- Light Pink White Chocolate Melting Wafers – These are for the erasers! The soft pink color instantly makes these cookies recognizable as pencils. You can also use a drop of pink candy coloring mixed into white chocolate if that’s what you have at home.
- Mini Chocolate Chips – These tiny little gems make the perfect “lead tip” of your pencil. They add just the right amount of chocolatey bite at the very end.
- Piping Bag with a #5 Tip – This is optional but recommended. A small round piping tip makes decorating neat and easy. If you don’t own one, a sandwich bag with the corner snipped off works beautifully.
👉 Want another quick snack idea that pairs well with these? Try my Apple Fruit Donuts. They’re just as colorful, fun for kids, and perfect for a lunchbox treat.
These ingredients come together to make cookies that are not only delicious but also adorable enough to wow teachers, classmates, and even your picky eaters at home.
Step-by-Step Instructions for Cute Back to School Wafer Pencil Cookies
These Cute Back to School Wafer Pencil Cookies are simple enough for even the busiest weeknight, and if your kids are anything like mine, they’ll want to help with every step (especially when chocolate is involved!). Here’s how to bring them to life:
Step 1: Shape the Wafer Cookies
Take your vanilla wafers and carefully trim one end to create a pointed “pencil tip.” A sharp knife works best here—just be gentle so the cookie doesn’t crack. Don’t worry if they’re not perfect; once the chocolate goes on, they’ll look like the real deal.
Pro tip: Make a few extras. There’s always one cookie that crumbles when you least expect it (and yes, those “mistakes” are 100% snackable).
Step 2: Melt the Chocolate
Now it’s time to prepare your “decorating paint.” Place your white and pink melting wafers into separate microwave-safe bowls. Heat each bowl in 30-second bursts, stirring in between, until smooth.
Be patient here—if you rush, the chocolate can burn and turn grainy. If that happens, you’ll have to start over (ask me how I know…).
Step 3: Fill Your Piping Bags
Scoop the melted chocolates into piping bags fitted with a #5 round tip. If you don’t have piping bags, grab a zip-top sandwich bag and snip the tiniest corner off. It works like a charm.
If you’ve ever made my Peanut Butter Banana Roll Ups, you know I love recipes where you don’t need special equipment. This is one of them!
Step 4: Add the Eraser
Time to give your pencils some personality! On the flat end of the wafer, pipe a layer of pink chocolate, covering about one-quarter of the cookie. Gently tap or shake the wafer to smooth out the chocolate.
Be careful not to over-shake or you might end up wearing pink chocolate like nail polish (yes, it happened in my kitchen).
Step 5: Create the Wooden Pencil Tip
On the pointed end of your wafer, pipe a neat triangle of white chocolate. This is the “wooden” part of your pencil. Give the cookie another gentle shake so the chocolate settles into a smooth surface.
This part is my kids’ favorite because it’s when the cookie really starts to look like a pencil.
Step 6: Add the Lead Point
Before the white chocolate hardens, press a mini chocolate chip onto the very tip. This tiny detail makes the cookie instantly recognizable as a pencil.
Work quickly! If you get distracted—say, by talking about first-day-of-school outfits like we did—you might miss your window before the chocolate sets.
Step 7: Let Them Harden
Place the finished cookies on a parchment-lined tray and let them set until firm. You can speed things up by popping the tray into the fridge for about 15 minutes, but I usually just leave them overnight. That way, they’re ready to pack into lunchboxes the next morning.
And that’s it! You’ve got yourself a batch of Cute Back to School Wafer Pencil Cookies that are crunchy, chocolatey, and ridiculously cute. Perfect for lunchbox surprises, classroom treats, or even as a little gift for your child’s teacher.
Tips and Tricks for Perfect Wafer Pencil Cookies
- Keep it simple: If piping bags make you sweat, use sandwich bags with the corner snipped.
- Batch prep: Melt all chocolates at once, then decorate assembly-line style.
- Mess saver: Line your counter with wax paper to catch drips.
- Kid-friendly task: Let kids press on the mini chocolate chips—they’ll feel like little artists.
Storage
Store in an airtight container at room temperature for up to 3 days. For make-ahead, you can refrigerate them, but bring to room temp before serving so the chocolate doesn’t “sweat.”
FAQs
Can I make these gluten-free?
Yes! Just grab a gluten-free wafer cookie.
Do I need fancy piping tips?
Nope. A ziplock bag works just fine.
Can I freeze them?
Technically yes, but the chocolate may discolor when thawed. Best to make fresh.
Conclusion
There you have it—Cute Back to School Wafer Pencil Cookies that are fun to make and even more fun to eat. Perfect for slipping into lunchboxes, gifting to teachers, or serving at back-to-school parties.
Follow us on Pinterest for weekly slow cooker inspiration, or join the conversation over on our Facebook page where fellow food lovers share their favorite comfort meals.
Print
Cute Back to School Wafer Pencil Cookies
- Total Time: 25 minutes
- Yield: 24 cookies 1x
- Diet: Vegetarian
Description
Adorable no-bake wafer “pencil” cookies dipped in pink and white melting chocolate and finished with a mini chocolate chip tip—perfect for back-to-school treats and lunchbox surprises.
Ingredients
24 vanilla wafer-style cookies (long oval if available), ends trimmed to a point on one side
8 oz bright white chocolate melting wafers
6 oz light pink white chocolate melting wafers
2 tbsp mini chocolate chips
Piping bags with small round tip (#5) or zip-top bags with a tiny corner snipped (optional)
Instructions
1. Trim one end of each vanilla wafer cookie into a gentle point to create the pencil tip; set aside any crumbs.
2. Place white and pink melting wafers into separate microwave-safe bowls; heat each in 30-second bursts, stirring between intervals, until smooth and fluid.
3. Transfer melted chocolates to piping bags fitted with a #5 tip (or use zip-top bags with a very small corner snipped).
4. Pipe pink chocolate across the flat end of each wafer, covering about one-quarter of the cookie to form the eraser; tap gently to smooth.
5. Pipe a small triangle of white chocolate on the pointed end to create the wooden pencil tip; tap gently to settle.
6. While the white chocolate is still soft, press a single mini chocolate chip at the very point to form the pencil “lead.”
7. Arrange cookies on a parchment-lined tray and let set at room temperature until firm, or refrigerate 10–15 minutes to speed setting; serve or store airtight.
Notes
If white chocolate is too thick, stir in 1–2 tsp neutral oil or a small dab of shortening to thin.
No pink wafers? Tint white melting chocolate with oil-based or candy coloring; avoid water-based dyes which can seize chocolate.
Work in small batches so the chocolate stays fluid; re-warm in short bursts if needed.
Make-ahead: Store in an airtight container at cool room temperature for up to 5 days; separate layers with parchment.
Allergy-friendly swaps: Use dairy-free melting wafers and dairy-free mini chips if needed.
- Prep Time: 25 minutes
- Cook Time: 0 minutes
- Category: Dessert
- Method: No-Bake
- Cuisine: American
Nutrition
- Serving Size: 1 cookie
- Calories: 90
- Sugar: 8g
- Sodium: 35mg
- Fat: 4g
- Saturated Fat: 2.5g
- Unsaturated Fat: 1g
- Trans Fat: 0g
- Carbohydrates: 13g
- Fiber: 0g
- Protein: 1g
- Cholesterol: 5mg
Keywords: back to school treats, wafer pencil cookies, no-bake cookies, kids snacks, classroom treat